Egyptian Expeditionary Force
| Egyptian Expeditionary Force | |
|---|---|
| Active | 1916–19 |
| Country | |
| Engagements | First World War
|
| Commanders | |
| Notable commanders | Archibald Murray (1916–17) Edmund Allenby (1917–19) |

A mint stamp of the Egyptian Expeditionary Force available at EEF post offices in Lebanon.
The Egyptian Expeditionary Force (EEF) was a British Empire military formation, formed on 10 March 1916 under the command of General Archibald Murray from the Mediterranean Expeditionary Force and the Force in Egypt (1914–15), at the beginning of the Sinai and Palestine Campaign of the First World War.

1920 EEF laissez passer, travel document, issued at Jerusalem, British Mandate.
Contents
1 History
2 1916
2.1 General organisation in April 1916
2.2 Order of battle April
2.3 Distribution, 27 July
2.4 No. 3 Section Canal Defences August
2.5 Eastern Frontier Force
2.6 Western Frontier Force
2.7 Order of battle 23 December
2.8 Desert Column December
3 1917
3.1 Order of Battle 9 January
3.2 Order of Battle March
3.3 Organization in April 1917
3.4 Order of Battle April
3.5 Expansion of Desert Column June 1917
3.6 Order of Battle October
4 1918
4.1 Deployment, 9 February
4.2 Shea's Force March
4.3 Order of Battle April
4.4 Order of Battle 19 September
5 See also
6 Notes
7 References
8 Bibliography
History
Formed in the British protectorate of the Sultanate of Egypt, the initially small force was raised to guard the Suez Canal and Egypt. After the withdrawal from the Gallipoli Campaign the force grew into a large reserve force designed to provide reinforcements for the Western Front, while the Western Frontier Force fought in the Senussi Campaign from 1915 to 1917, and the Eastern Frontier Force defended the canal at the Battle of Romani in August 1916.[1][2][3][4] Following the victory at Romani, part of Eastern Force pursued the Ottoman Empire invading force back to Palestine after the victories at the Battle of Magdhaba in December 1916 and the Battle of Rafa in January 1917, by which time Desert Column had been formed within Eastern Force. These victories which resulted in the recapture of substantial Egyptian territory were followed in March and April, by two EEF defeats on Ottoman Turkish Empire territory, at the First and Second Battles of Gaza in southern Palestine.[5]
During the Stalemate in Southern Palestine from April to October 1917, Murray consolidated the EEF's position and in June General Edmund Allenby took command and began preparations to take the offensive, employing maneuver warfare He reorganised the force into the XX Corps, XXI Corps and Desert Mounted Corps formerly Desert Column.[6] On 31 October two corps captured Beersheba defended by the Turkish III Corps (which had fought at Gallipoli), which weakened their defences stretching almost continually from Gaza to Beersheba. Subsequently the Battle of Tel el Khuweilfe, the Third Battle of Gaza and the Battle of Hareira and Sheria forced the withdrawal from Gaza on the night of 6/7 November at the beginning of the pursuit to Jerusalem. During the subsequent operations, about fifty miles (80 km) of formerly Turkish territory, was captured as a result of the EEF victories at the Battle of Mughar Ridge, fought between 10 and 14 November, and the Battle of Jerusalem fought between 17 November and 30 December. Serious losses on the Western Front in March 1918 during the German Spring Offensive, forced the British Empire to send reinforcements from the EEF. During this time, two unsuccessful attacks were made to capture Amman and to capture Es Salt in March and April 1918, before Allenby's force resumed the offensive, again employing manoeuvre warfare at the Battle of Megiddo. The successful infantry battles at the Battle of Tulkarm and the Battle of Tabsor, created gaps in the Ottoman front line, enabling the pursuit by the Desert Mounted Corps to encircle the infantry fighting in the Judean Hills when fighting occurred during the Battle of Nazareth, the Afulah, Beisan, the Jenin, the Battle of Samakh, and the capture of Tiberias. In the process the EEF destroyed three Turkish Armies during the Battle of Sharon, the Battle of Nablus and the Third Transjordan attack, capturing thousands of prisoners and large quantities of equipment. Subsequently the EEF pursued the surviving German and Turkish forces to Damascus, and Aleppo, before the Ottoman Turkish Empire agreed to the Armistice of Mudros on 30 October 1918, ending the Sinai and Palestine Campaign. The British Mandate of Palestine, and the French Mandate for Syria and Lebanon were created to administer the captured territories.[7]
1916
Canal Defences (General Murray)
No.1 Section, Headquarters Suez – IX Corps (January to March)
No.2 Section, Headquarters Ismailia – I Anzac Corps (January to March)
Imperial Service Cavalry Brigade
- Jodhpur Lancers
- Mysore Lancers
- Hyderabad Lancers
- 11th Light Horse Regiment
- 12th Light Horse Regiment
(incomplete)
No.3 Section, Headquarters Port Said – (Major General H.A. Lawrence)
- 42nd (East Lancashire) Division
- 125th (Lancashire Fusiliers) Brigade
- 126th (East Lancashire) Brigade
- 127th (Manchester) Brigade
52nd (Lowland) Division (Major General W.E.B. Smith)
- 155th (South Scottish) Brigade
- 156th (Scottish Rifles) Brigade
157th (Highland Light Infantry) Brigade[Note 1]
- Australian and New Zealand Mounted Division (Anzac Mounted Division) (Major General Sir H.G. Chauvel)
1st Australian Light Horse Brigade
- 1st Light Horse Regiment
- 2nd Light Horse Regiment
- 3rd Light Horse Regiment
- Leicestershire Royal Horse Artillery
2nd Australian Light Horse Brigade
- 5th Light Horse Regiment
- 6th Light Horse Regiment
- 7th Light Horse Regiment
- Ayrshire Royal Horse Artillery
3rd Australian Light Horse Brigade
- 8th Light Horse Regiment
- 9th Light Horse Regiment
- 10th Light Horse Regiment
- Inverness-shire Royal Horse Artillery
New Zealand Mounted Rifles Brigade (Brigadier General E. W. C. Chaytor)
Auckland Mounted Rifles Regiment (Lieutenant Colonel C. E. R. Mackesy)
Canterbury Mounted Rifles Regiment (Lieutenant Colonel J. Findlay)
Wellington Mounted Rifles Regiment (Lieutenant Colonel W. Meldrum)
Somerset Royal Horse Artillery[8][9][10][11][12]
5th Mounted Brigade (Brigadier General E. A. Wiggin)
- Royal Gloucestershire Hussars
- Warwickshire Yeomanry
- Worcestershire Yeomanry
Imperial Camel Corps Brigade (Brigadier General C. L. Smith VC)
- 1st (Australian) Battalion
- 2nd (British) Battalion
- 3rd (Australian) Battalion
- 4th (ANZAC) Battalion[8][9][10][11][13][14]
No. 1 Squadron, Australian Flying Corps (Lieutenant Colonel E. H. Reynold)
- A Flight (Captain W. Sheldon – four machines later expanded to six)
- B Flight (Lieutenant Manwell – four machines later expanded to six)
- C Flight (Captain Williams – four machines later expanded to six)
Until almost the end of 1917, No. l Squadron, A.F.C., and No. 14 Squadron, R.F.C., were the sole flying units east of the Suez Canal.[15]
General organisation in April 1916
General Headquarters
- General Headquarters Troops
- No. 1 Section (IX Corps)
- No. 2 Section (II ANZAC)
- No. 3 Section (Anzac Mounted Division)
- Western Frontier Force
- Northwestern Section
- Southwestern Section
- L. of C. Defence Troops
- Inspector-General of Communications
- Alexandria District
- Cyprus Garrison
- Lines of Communication Units[16]
Order of battle April
General Headquarters
- Commander in Chief – Lieutenant General (temp. General) A. J. Murray
- Chief of General Staff – Major General A. L. Lynden-Bell
Headquarters of Administrative services and departments
Army Signals, Work, Supplies and Transport, Railways, Ordnance, Remounts, Veterinary Services, Medical Services, Army Postal Services, Paymaster
Inspector General of Communication and Levant Base
Anzac Mounted Division GOC Colonel (temp. Major General) H.G. Chauvel
- 1st Light Horse Brigade (Western Force) GOC Lieutenant Colonel C. F. Cox (acting)
- 1st Light Horse Regiment
- 2nd Light Horse Regiment
- 3rd Light Horse Regiment
- 4th Light Horse Regiment (attached)
- 2nd Light Horse Brigade GOC Colonel (temp. Brigadier General G. de L. Ryrie
- 5th Light Horse Regiment
- 6th Light Horse Regiment
- 7th Light Horse Regiment
- 12th Light Horse Regiment (attached)
- 3rd Light Horse Brigade GOC Brevet Lieutenant Colonel (temp. Brigadier General) J. M Antill
- 8th Light Horse Regiment
- 9th Light Horse Regiment
- 10th Light Horse Regiment
- 11th Light Horse Regiment (attached)
- New Zealand Mounted Rifles Brigade GOC Brigadier General E. W. C. Chaytor)
- Auckland Mounted Rifle Regiment
- Canterbury Mounted Rifle Regiment
- Wellington Mounted Rifle Regiment
- Otago Mounted Rifles Regiment (attached)
- 1st Light Horse Brigade (Western Force) GOC Lieutenant Colonel C. F. Cox (acting)
Divisional Troops
- Artillery
III Brigade, Royal Horse Artillery (T.F.) Leicestershire and Somerset Batteries
IV Brigade, Royal Horse Artillery (T.F.) Inverness-shire and Ayrshire Batteries
- Engineers
- 1st Australian Field Squadron
- Signal Service
- 1st Anzac Signal Squadron
- Army Service Corps (ASC)
- HQ, Light Horse Divisional ASC
- Light Horse Supply Column (M.T.)
- Medical Units
- 1st, 2nd and 3rd Light Horse Field Ambulances
- NZ Mounted Brigade Ambulance
IX Corps
GOC Major General (temp. Lieutenant General) F. J. Davies
- Corps Troops
- Mounted Troops
8th Mounted Brigade
- 1/1st City of London Yeomanry
- 1/1st County of London Yeomanry
- 1/3rd County of London Yeomanry
- 1/1st London Signal Troop
- "B" Battery, Honourable Artillery Company (H.A.C.)
- No. 9 Field Troop
- 1/1st London Mounted Brigade Field Ambulance
- Signal Service
- HH and KK Cable Section
- London Pack Wireless Section
- Northern Wagon Wireless Section
42nd (East Lancashire) Division
GOC Major General W. Douglas
125th (Lancashire Fusiliers) Brigade GOC Colonel (temp. Brigadier General) H. C. Frith
- 1/5th Lancashire Fusiliers
- 1/6th Lancashire Fusiliers
- 1/7th Lancashire Fusiliers
- 1/8th Lancashire Fusiliers
- 125th Brigade Machine Gun Company
- 1/5th Lancashire Fusiliers
126th (East Lancashire) Brigade GOC Major (temp. Brigadier General) A. W. Tufnell
- 1/4th East Lancashire Regiment
- 1/5th East Lancashire Regiment
- 1/9th Manchester Regiment
- 1/10th Manchester Regiment
- 126th Brigade Machine Gun Company
- 1/4th East Lancashire Regiment
127th (Manchester) Brigade GOC Lieutenant Colonel (temp. Brigadier General) V. A. Ormsby
- 1/5th Manchester Regiment
- 1/6th Manchester Regiment
- 1/7th Manchester Regiment
- 1/8th Manchester Regiment
- 127th Brigade Machine Gun Company
Divisional Troops
- Mounted Troops
- 1 Squadron Duke of Lancaster's Own Yeomanry
- 13th Cyclist Company
- 1 Squadron Duke of Lancaster's Own Yeomanry
- Artillery
- 1/1st East Lancashire Brigade RFA
- 1/2nd East Lancashire Brigade RFA
- 1/3rd East Lancashire Brigade RFA
- 1/4th East Lancashire (Howitzer) Brigade RFA
- 42nd Divisional Ammunition Column
- 1/1st East Lancashire Brigade RFA
- Engineers
- 1/1st East Lancashire Field Company RE
- 1/2nd East Lancashire Field Company RE
- 1/2nd West Lancashire Field Company RE
- Signal Service
- 42nd Divisional Signal Company
- ASC
- 42nd Divisional Train
- Medical Units
- 1/1st, 1/2nd and 1/3rd East Lancashire Field Ambulances
3rd Dismounted Brigade (attached)
GOC Lieutenant Colonel Lord Kensington (Acting)
- 1/1st Royal East Kent Yeomanry
- 1/1st Queen's Own West Kent Yeomanry
- 1/1st Sussex Yeomanry
- 1/1st Welsh Horse
- 1/1st Norfolk Yeomanry
- 1/1st Suffolk Yeomanry
- Machine Gun Company
- 3rd Dismounted Brigade Signal Troop
- 1/1st Eastern and 1/1st South Eastern Mounted Brigade Field Ambulances
54th (East Anglian) Division
GOC Colonel (temp. Major General) S. W. Hare
161st (Essex) Brigade
- 1/4th Essex Regiment
- 1/5th Essex Regiment
- 1/6th Essex Regiment
- 1/7th Essex Regiment
- 161st Machine Gun Company
- 1/4th Essex Regiment
162nd (East Midland) Brigade
- 1/5th Bedfordshire Regiment
- 1/4th Northamptonshire Regiment
- 1/10th London Regiment
- 1/11th London Regiment
- 162nd Machine Gun Company
- 1/5th Bedfordshire Regiment
163rd (Norfolk and Suffolk) Brigade
- 1/4th Norfolk Regiment
- 1/5th Norfolk Regiment
- 1/8th Hampshire Regiment
- 163rd Machine Gun Company
- 1/4th Norfolk Regiment
Divisional Troops
- Mounted Troops
- 1 Squadron 1/1st Hertfordshire Yeomanry (with HQ and Machine Gun Section)
- Artillery
- 1/1st East Anglian Brigade RFA
- 1/2nd East Anglian Brigade RFA
- 1/3rd East Anglian Brigade RFA
- 1/4th East Anglian Brigade RFA
- 54th Divisional Ammunition Column (one officer and 35 other ranks)
- Engineers
- 2/1st East Anglian Field Company RE
- 1/2nd East Anglian Field Company RE
- 1/1st Kent Field Company RE
- Signal Service
- 54th Divisional Signal Company
- ASC
- 54th Divisional Train (Supply details only)
- Medical Units
- 2/1st, 1/2nd and 1/3rd East Anglian Field Ambulances
20th Indian Brigade (attached)
GOC Brigadier General H. D. Watson
- 2/3rd Gurkhas
- 58th Rifles
- Alwar Infantry (I.S.)
- Gwalior Infantry (I.S.)
29th Indian Brigade
GOC Colonel (temp. Brigadier General) P. C. Palin
- 23rd Pioneers
- 57th Rifles
- Patiala Infantry (I.S.)
- No. 10 Co. King's Own Sappers and Miners
- 110, 121, 135 Indian Field Ambulances
- 7th and 26th Mule Corps
II Australian and New Zealand Army Corps (II ANZAC)
GOC Major General (temp. LIeutenant General) A. J. Godley
- Corps Troops
- Signal Service
- No. 24 Airline Section
- FF and NN Cable Sections
- 1st Australian Ammunition Park
- 1st Australian Supply Column
- Royal Australian Navy Bridging Train
- 14th Fortress Company RE
- Signal Service
4th Australian Division
GOC Major General H. V. Cox
- 4th Australian Infantry Brigade
GOC Colonel (temp. Brigadier General) J. Monash
- 13th Battalion
- 14th Battalion
- 15th Battalion
- 16th Battalion
- 4th Machine Gun Company
- 12th Australian Infantry Brigade
- 45th Battalion
- 46th Battalion
- 47th Battalion
- 48th Battalion
- 12th Machine Gun Company
- 13th Australian Infantry Brigade
- 49th Battalion
- 50th Battalion
- 51st Battalion
- 52nd Battalion
- 13th Machine Gun Company
Divisional Troops
- Mounted Troops
- "B" Squadron 13th Light Horse Regiment
- 4th Divisional Cyclist Company
- Artillery
- X Field Artillery Brigade
- XI Field Artillery Brigade
- XII Field Artillery Brigade
- XXIV Howitzer Brigade
- 4th Divisional Ammunition Column
- Engineers
- 4th Field Company
- 12th Field Company
- 13th Field Company
- Signal Service
- 4th Divisional Signal Company
- Pioneers
- 4th Pioneer Battalion
- ASC
- 7th, 14th, 26th and 27th Coys, AASC
- Medical Units
- 4th, 12th, 13th Field Ambulances
5th Australian Division
GOC Colonel (temp Major General) J. W. McCay
- 8th Australian Infantry Brigade
- 29th Battalion
- 30th Battalion
- 31st Battalion
- 32nd Battalion
- 8th Machine Gun Company
- 14th Australian Infantry Brigade
- 53rd Battalion
- 54th Battalion
- 55th Battalion
- 56th Battalion
- 14th Machine Gun Company
- 15th Australian Infantry Brigade
- 57th Battalion
- 58th Battalion
- 59th Battalion
- 60th Battalion
- 15th Machine Gun Company
Divisional Troops
- Mounted Troops
- "C" Squadron 13th Light Horse Regiment
- 5th Divisional Cyclist Company
- Artillery
- XIII Field Artillery Brigade
- XIV Field Artillery Brigade
- XV Field Artillery Brigade
- XXV Howitzer Brigade
- 5th Divisional Ammunition Column
- Engineers
- 8th Field Company
- 14th Field Company
- 15th Field Company
- Signal Service
- 5th Divisional Signal Company
- Pioneers
- 5th Pioneer Battalion
- ASC
- 10th, 18th, 28th and 29th Coys, AASC
- Medical Units
- 8th, 14th, 15th Field Ambulances
11th (Northern) Division
GOC Major General E. A. Fanshawe
32nd Brigade
- 9th West Yorkshire Regiment
- 6th Yorkshire Regiment
- 8th West Riding Regiment
- 6th York and Lancaster Regiment
- 32nd Brigade Machine Gun Company
- 9th West Yorkshire Regiment
33rd Brigade
- 6th Lincolnshire Regiment
- 6th Border Regiment
- 7th South Staffordshire Regiment
- 9th Sherwood Foresters
- 33rd Brigade Machine Gun Company
- 6th Lincolnshire Regiment
34th Brigade
- 8th Northumberland Fusiliers
- 9th Lancashire Fusiliers
- 5th Dorsetshire Regiment
- 8th Northumberland Fusiliers
- 11th Manchester Regiment
- 34th Brigade Machine Gun Company
Divisional Troops
- Mounted Troops
- 1 Squadron 1/1st Hertfordshire Yeomanry
- 11th Cyclist Company
- Artillery
- LVIII Brigade RFA
- LIX Brigade RFA
- LX Brigade RFA
- CXXXIII Brigade RFA
- Engineers
- 67th Field Company RE
- 68th Field Company RE
- 86th Field Company RE
- Signal Service
- 11th Divisional Signal Company
- Pioneers
- 6th East Yorkshire Regiment
- ASC
- 11th Divisional Train (Supply details only)
- Medical Units
- 33rd, 34th, 35th Field Ambulances
No. 3 Section Canal Defences
GOC etc Headquarters 52nd Division
- Corps Troops
- Mounted Troops
- 5th Mounted Brigade
- 1/1st Warwick Yeomanry
- 1/1st Gloucester Yeomanry
- 1/1st Worcester Yeomanry
- 1/1st South Midland Signal Troop
- "A" Battery, H.A.C.
- No. 7 Field Troop
- 1/1st South Midland Mounted Brigade Field Ambulance
- Engineers
- 220th Army Troops Company RE
- Signal Service
- No. 21 Airline Section
- WW Cable Section
52nd (Lowland) Division
GOC Major General H. A. Lawrence
155th (South Scottish) Brigade
- 1/4th Royal Scots Fusiliers
- 1/5th Royal Scots Fusiliers
- 1/4th King's Own Scottish Borderers
- 1/5th King's Own Scottish Borderers
- 155th Brigade Machine Gun Company
- 1/4th Royal Scots Fusiliers
156th (Scottish Rifles) Brigade
- 1/4th (Queen's Edinburgh Rifles) Royal Scots
- 1/7th Royal Scots
- 1/7th Scottish Rifles
- 1/8th Scottish Rifles
- 156th Brigade Machine Gun Company
157th (Highland Light Infantry) Brigade
- 1/5th Highland Light Infantry
- 1/6th Highland Light Infantry
1/7th (Blythswood) Bn, Highland Light Infantry- 1/5th Argyll and Sutherland Highlanders
- 157th Brigade Machine Gun Company
- 1/5th Highland Light Infantry
Divisional Troops
- Mounted Troops
- HQ and "C" Squadron Royal Glasgow Yeomanry
- 52nd Cyclist Company
- HQ and "C" Squadron Royal Glasgow Yeomanry
- Artillery
- 1/2nd Lowland Brigade RFA
- 1/3rd Lowland Brigade RFA
- 1/4th Lowland Brigade RFA
- 1/5th Lowland Brigade RFA
- 52nd Divisional Ammunition Column (one officer and 35 other ranks)
- Engineers
- 2/1st Lowland Field Company RE
- 2/2nd Lowland Field Company RE
- 1/2nd Lowland Field Company RE
- Signal Service
- 52nd Divisional Signal Company
- ASC
- 52nd Divisional Train
- Medical Units
- 1/1st, 1/2nd and 1/3rd Lowland Field Ambulances
1st Dismounted Brigade (attached)
GOC Temp Brigadier General Marquess of Tullibardine
- 1/1st Scottish Horse
- 1/2nd Scottish Horse
- 1/3rd Scottish Horse
- 1/1st Ayr Yeomanry
- 1/1st Lanark Yeomanry
- Machine Gun Company
- 1st Dismounted Brigade Signal Troop
- 1/1st Scottish and 1/1st Lowland Mounted Brigade Field Ambulances
Western Frontier Force
GOC Major General W. E. Peyton
- Force Troops
- Mounted Troops
6th Mounted Brigade
- 1/1st Buckinghamshire Yeomanry
- 1/1st Berkshire Yeomanry
- 1/1st Dorsetshire Yeomanry
- 1/2nd South Midland Field Troop Signal [sic]
- No. 6 Field Troop
- 1/2nd South Midland Mounted Brigade Field Ambulance
1/2nd County of London Yeomanry (attached)- Royal Flying Corps
- No. 17 Squadron
- Artillery
- 1/1st Berkshire Battery RHA
- 1/1st Nottinghamshire Battery RHA
- Infantry
- 1st Battalion British West Indies Regiment
- 2nd Battalion British West Indies Regiment
- 3rd Battalion British West Indies Regiment
- 1st Battalion British West Indies Regiment
- Signal Service
- 2nd Mounted Divisional Signal Squadron
- No. 42 Airline Section
- UU Cable Section
- No. 6 Pack Wireless Section
North Western Section
GOC etc Headquarters 53rd Division
53rd (Welsh) Division
GOC Colonel (temp. Major General) A. G. Dallas
158th (North Wales) Brigade
- 1/5th Royal Welch Fusiliers
- 1/6th Royal Welch Fusiliers
- 1/7th Royal Welch Fusiliers
- 1/1st Herefordshire Regiment
- 158th Brigade Machine Gun Company
- 1/5th Royal Welch Fusiliers
159th (Cheshire) Brigade
- 1/4th Cheshire Regiment
- 1/7th Cheshire Regiment
- 1/4th Welch Regiment
- 1/5th Welch Regiment
- 159th Brigade Machine Gun Company
- 1/4th Cheshire Regiment
160th (Welsh Border) Brigade
- 1/4th Royal Sussex Regiment
- 2/4th Royal West Surrey Regiment
- 2/4th Royal West Kent Regiment
- 2/10th Middlesex Regiment
- 160th Brigade Machine Gun Company
- 1/4th Royal Sussex Regiment
Divisional Troops
- Mounted Troops
- 1 Squadron 1/1st Hertfordshire Yeomanry
- 53rd Divisional Cyclist Company
- 1 Squadron 1/1st Hertfordshire Yeomanry
- Artillery
- 1/1st Cheshire Brigade RFA
- 1/1st Welsh Brigade RFA
- 1/2nd Welsh Brigade RFA
- 1/4th Welsh Brigade RFA
- 53rd Divisional Ammunition Column (one officer and 35 other ranks)
- Engineers
- 1/1st Welsh Field Company RE
- 2/1st Welsh Field Company RE
- 2/1st Cheshire Field Company RE
- Signal Service
- 53rd Divisional Signal Company
- ASC
- 53rd Divisional Train
- Medical Units
- 1/1st, 1/2nd and 1/3rd Welsh Field Ambulances
4th Dismounted Brigade (attached)
GOC Temp Brigadier General John Stewart-Murray, Marquess of Tullibardine
- 1/1st Shropshire Yeomanry
- 1/1st Denbighshire Yeomanry
- 1/1st Cheshire Yeomanry
- 1/1st Glamorgan Yeomanry
- 1/1st Montgomeryshire Yeomanry
- 1/1st Pembrokeshire Yeomanry
- Machine Gun Company
- 4th Dismounted Brigade Signal Troop
- 1/1st Welsh Border and 1/1st South Wales Mounted Brigade Field Ambulances
22nd Mounted Brigade
- 1/1st Lincolnshire Yeomanry
- 1/1st Staffordshire Yeomanry
- 1/1st East Riding Yeomanry
- Signal Troop
- Mounted Brigade, ASC
- Mounted Brigade Field Ambulance
Provisional Infantry Brigade (less Headquarters)
- 1/6th Royal Scots
- 2/5th Devonshire Regiment
- 2/7th Middlesex Regiment
- 2/8th Middlesex Regiment
- 2nd Garrison battalion, Liverpool Regiment
- 2 Naval 4-inch guns
- 1/2nd Kent Field Company RE
17th Motor Machine Gun Battery
No. 1 Armoured Train
South Western Section
GOC Colonel (temp Brigadier General) H. W. Hodgson
- Mounted Troops
- 1st Australian Light Horse Brigade (see above)
- 1 squadron Egyptian Army Cavalry
- Infantry
- 2nd Garrison Battalion Cheshire Regiment
- 1 Company and Machine Gun Section Egyptian Army
- Signal Service
- Detachment 2nd Mounted Divisional Signal Squadron
- Emergency Squadron, Royal Naval Armoured Car Division
- H.Q. and Nos. 1, 2, 3 Light Armoured Motor Batteries
- No. 2 Armoured Train
General Headquarters Troops
- Mounted Troops
- Imperial Camel Corps
- Birkanir Camel Corps
- Royal Flying Corps
- 5th Wing Royal Flying Corps
- No. 14 Squadron RFC
No. 17 Squadron RFC (with Western Force)- 2 Kite Balloon Sections (Naval)
- 5th Wing Royal Flying Corps
Artillery
- Heavy Artillery
- XX Brigade Royal Garrison Artillery (RGA)
- 10th, 15th 91st Heavy Batteries RGA
- 1 Heavy Battery and 1 Section Heavy Battery, Royal Marine Artillery
- XX Brigade Royal Garrison Artillery (RGA)
- Stokes Gun Batteries
- 125th, 126th, 161st, 162nd Brigade Batteries
- Anti-Aircraft Artillery
- Nos. 30 and 38 Anti-Aircraft Sections
- Mountain Artillery
- 4th Highland Mountain Battery RGA
- Armoured Cars
- Nos 11 and 12 Armoured Motor Batteries
Engineers
- 11th, 116, 276th Railway Companies RE
Signal Service
- GHQ Signal Company
- Nos 14 and 15 Airline Sections,
- NA, NB and VV Cable Sections
- Unallotted
- Southern Motor, W/T Station
- No. 5 Pack Wireless Section
- Unallotted
ASC
- 338th, 493rd, 619th Mechanical Transport Companies ASC
Transport
- Camel Transport Corps
- 59th, 62nd, 70th, 191st Camel Corps
Lines of Communication Defence Troops
- Mounted Troops
- Imperial Service Cavalry Brigade
- Mysore Lancers
- 1st Hyderabad Lancers
- Kathiwar Signal Troop
- 124th Indian Cavalry Field Ambulance
- Imperial Service Cavalry Brigade
- Infantry
- 1st Garrison Battalion, Essex Regiment
- 2nd Garrison Battalion, Royal Welch Fusiliers
- 1st Garrison Battalion, Devonshire Regiment
- 1st Garrison Battalion, Royal Scots (less two companies)
- 1st Garrison Battalion, Liverpool Regiment
- 1st Garrison Battalion, Royal Irish Regiment
- 19th Garrison Battalion, Rifle Brigade
- 20th Garrison Battalion, Rifle Brigade
- 21st Garrison Battalion, Rifle Brigade
- 22nd Garrison Battalion, Rifle Brigade
- 1st Garrison Battalion, Royal Warwickshire Regiment (Khartoum)
Alexandria District
- Coast Defence Artillery
- 84th Siege Battery RGA
- 92nd Company RGA, Mex Battery
- Ras el Tin Battery
- Silsileh Battery
- "Y" Battery Royal Malta Artillery
and Lines of Communications units of Infantry, Signal Service, Engineers, ASC, Medical Units, Ordnance Units, Veterinary Units and Postal Units.[17]
Distribution, 27 July
Eastern Frontier
No. 1 Section
- 8th Mounted Brigade
- 54th (East Anglian) Division (less 163rd Brigade)
- 20th Indian Brigade
- 29th Indian Brigade
No. 2 Section
- 3rd Light Horse Brigade
- 160th (Welsh Border) Brigade (53rd Division)
- 163rd (Norfolk and Suffolk) Brigade (54th Division)
- British West Indies Brigade
No. 2a Section
- 42nd (East Lancashire) Division
No. 3 Section
- Anzac Mounted Division
- 5th Mounted Brigade
- 52nd (Lowland) Division
- 158th Brigade (53rd Division)
- 1st Dismounted Brigade
Western Frontier
- 6th Mounted Brigade
- 22nd Mounted Brigade
- Part 53rd Division
- 2nd Dismounted Brigade
- 4th Dismounted Brigade[18]
No. 3 Section Canal Defences August
Canal Defences No. 3 Section Headquarters Kantara (included Romani) (Major General H.A. Lawrence)
Force Defending Romani on 4 August
- 52nd (Lowland) Division (Major General W.E.B. Smith)
- 155th (South Scottish) Brigade
- 156th (Scottish Rifles) Brigade
- 157th (Highland Light Infantry) Brigade
- Anzac Mounted Division (Major General Sir H.G. Chauvel)
- 1st Australian Light Horse Brigade (Brigadier General J. B. H. Meredith)
- 1st Light Horse Regiment
- 2nd Light Horse Regiment
- 3rd Light Horse Regiment
- 2nd Australian Light Horse Brigade (Brigadier General J. R. Royston)
- Wellington Mounted Rifle Regiment (Lieutenant Colonel W. Meldrum) detached from New Zealand Mounted Rifles Brigade
- 6th Light Horse Regiment
- 7th Light Horse Regiment
- (5th Light Horse Regiment at Duidar)
- 1st Australian Light Horse Brigade (Brigadier General J. B. H. Meredith)
Force moved to Romani during 4 August and took part in the battle
- 5th Mounted Brigade (Brigadier General E.A. Wiggin)
- Gloucestershire Hussars
- Warwickshire Yeomanry
- Worcestershire Yeomanry
- New Zealand Mounted Rifles Brigade (Brigadier General E. W. C. Chaytor)
- Auckland Mounted Rifle Regiment (Lieutenant Colonel C. E. R. Mackesy)
- Canterbury Mounted Rifle Regiment (Lieutenant Colonel J. Findlay)
Force moved to Romani during 4 August and took part in the battle on 5 August
- 42nd (East Lancashire) Division
- 125th (Lancashire Fusiliers) Brigade
- 126th (East Lancashire) Brigade
- 127th (Manchester) Brigade
- 3rd Australian Light Horse Brigade
- 8th Light Horse Regiment
- 9th Light Horse Regiment
- 10th Light Horse Regiment[19][20]
Eastern Frontier Force
- October 1916
Eastern Frontier Force, also known as Eastern Force, was formed in Cairo on 18 October 1916 with headquarters at Ismailia. The force was commanded by Lieutenant General C. M. Dobell, who had previously commanded Western Frontier Force.[21]
Eastern Force consisted of
- 52nd (Lowland) Division
- 155th (South Scottish) Brigade
- 156th (Scottish Rifles) Brigade
- 157th (Highland Light Infantry) Brigade
53rd (Welsh) Division
- 158th (North Wales) Brigade
- 159th (Cheshire) Brigade
- 160th (Welsh Border) Brigade
- 54th (East Anglian) Division
- 161st (Essex) Brigade
- 162nd (East Midland) Brigade
- 163rd (Norfolk and Suffolk) Brigade
- Anzac Mounted Division
- 1st Australian Light Horse Brigade
- 1st Light Horse Regiment
- 2nd Light Horse Regiment
- 3rd Light Horse Regiment
- 4th Light Horse Regiment (attached)
- 2nd Australian Light Horse Brigade
- 5th Light Horse Regiment
- 6th Light Horse Regiment
- 7th Light Horse Regiment
- 12th Light Horse Regiment (attached)
- 3rd Australian Light Horse Brigade (commander Brevet Lieutenant Colonel J. M. Antill)
- 8th Light Horse Regiment
- 9th Light Horse Regiment
- 10th Light Horse Regiment
- 11th Light Horse Regiment (attached)
- New Zealand Mounted Rifles Brigade
- Auckland Mounted Rifles Regiment
- Canterbury Mounted Rifles Regiment
- Wellington Mounted Rifles Regiment
- Otago Mounted Rifles Regiment (less one squadron attached)
- 4 Territorial Royal Horse Artillery Batteries 2 Scottish and 2 English (Ayrshire, Inverness-shire, Somerset and Leicestershire Batteries)
- 1st Australian Light Horse Brigade
- 5th Mounted Brigade
- Gloucestershire Hussars
- Warwickshire Yeomanry
- Worcestershire Yeomanry
- Imperial Camel Corps Brigade
- 2 Light Car Patrols
No. 1 Squadron, Australian Flying Corps[22][23][24]
Western Frontier Force
- October 1916 to February 1917
Western Desert Force (Major General William Watson)
- Egyptian Army troops Darfur
- Sollum Recapture (Major General W. E. Peyton)
- Siwa Raid (General H. W. Hodgson)
- 1st Light Horse Brigade
- Imperial Camel Corps
- Bikanir Camel Corps
- Armoured Car Brigade (11 Rolls–Royces)
- 6 Light Car Patrols (Model T Fords armed with Lewis guns)[25][26][27]
Order of battle 23 December
- Anzac Mounted Division (Major General Chauvel)
- 1st Light Horse Brigade
- 1st Light Horse Regiment
- 2nd Light Horse Regiment
- 3rd Light Horse Regiment
- 3rd Light Horse Brigade
- 8th Light Horse Regiment
- 9th Light Horse Regiment
- 10th Light Horse Regiment
- New Zealand Mounted Rifles Brigade (Brigadier General E. W. C. Chaytor)
- Auckland Mounted Rifle Regiment (Lieutenant Colonel C. E. R. Mackesy)
- Canterbury Mounted Rifle Regiment (Lieutenant Colonel J. Findlay)
- Wellington Mounted Rifle Regiment (Lieutenant Colonel W. Meldrum)
- 1st Light Horse Brigade
- Imperial Camel Corps Brigade
- Hong Kong & Singapore Mountain Battery,
- Inverness-shire and Somerset Batteries Royal Horse Artillery
- No. 1 Squadron Australian Flying Corps
- No. 14 Squadron Royal Flying Corps[28][29][30]
Desert Column December
Desert Column Headquarters El Arish (Lieutenant General Sir Philip Chetwode)
- 42nd (East Lancashire) Division
- 125th (Lancashire Fusiliers) Brigade
- 126th (East Lancashire) Brigade
- 127th (Manchester) Brigade
52nd (Lowland) Division (Major General W. E. B. Smith)
- 155th (South Scottish) Brigade
- 156th (Scottish Rifles) Brigade
- 157th (Highland Light Infantry) Brigade
- Anzac Mounted Division (Major General H. G. Chauvel)
- 1st Light Horse Brigade
- 2nd Light Horse Brigade
- 3rd Light Horse Brigade
- New Zealand Mounted Rifles Brigade
- Imperial Camel Corps Brigade
[31][32][33][34][35]
- Royal Flying Corps 5th Wing stationed at Mustabig (Lieutenant Colonel W. G. H. Salmond)
- No. 14 (British) Squadron
- (No. 17 Squadron)
- No. 1 Squadron Australian Flying Corps / No. 67 (Australian) Squadron[29]
1917
Royal Flying Corps in Egypt in January 1917
- Headquarters Middle East Brigade
- 5th Wing
- No. 14 Squadron Royal Flying Corps
- No. 67 Squadron Royal Flying Corps
- 20th Reserve Wing
- Nos. 21, 22, 23, 57 and 58 Reserve Squadrons
- No. 3 School of Military Aeronautics.[36]
By January 1917 there were three smaller commands directly under GHQ EEF.
Western Force
- Bikanir Camel Corps
- 230th Brigade
- 231st Brigade
- Detachments R.A., dismounted (seven 15-pdr. guns, two 9-pdr. Krupp guns, two Naval 4-in. guns)
- 5 Armoured Motor Batteries
- 6 Light Car Patrols (Ford)
- Motor Machine Gun Battery
- 1 Garrison Battalion
Alexandria District
- 103rd Local Company RGA
- 5th Battalion British West Indies Regiment[37][Note 2]
- 2 Garrison Battalions
Delta District
- 2nd Battalion North Lancs Regiment (from East Africa)
- 1/4th Battalion Duke of Cornwall's Light Infantry (from Aden)
- 5 Garrison Battalions
With the front line approaching Gaza, the defence of the Suez Canal was still part of Eastern Force but had been reduced to:
Northern Section Suez Canal
- 20th Indian Brigade
- 1st Battalion British West Indies Regiment
- 2nd Battalion British West Indies Regiment
- 3 Garrison Battalions
Southern Section Suez Canal
- Imperial Service Cavalry Brigade
- 2 Companies Imperial Camel Corps
- 267th Brigade RFA (53rd Division)
- 272nd Brigade RFA (54th Division)
- 229th Brigade (to form part of the 74th Division).[37]
Order of Battle 9 January
Desert Column (Lieutenant General Philip Chetwode)
- Anzac Mounted Division (Major General Harry Chauvel)
- 1st Light Horse Brigade (Brigadier General Charles Frederick Cox)
- 3rd Light Horse Brigade (Brigadier General John Royston)
- New Zealand Mounted Rifles Brigade (Brigadier General Edward Chaytor)
- Inverness-shire, Leicestershire and Somerset Territorial Royal Horse Artillery batteries
- Imperial Camel Corps Brigade
- 1st (Australian) Battalion
- 2nd (British) Battalion
- 3rd (Australian) Battalion
- 4th (Australian and New Zealand) Battalion
- Hong Kong and Singapore Mountain Battery
- 5th Mounted Brigade
- Honourable Artillery Company (18–pounder) Battery
- No. 7 Light Car Patrol (six Ford cars equipped with machine guns)
- No. 1 Squadron Australian Flying Corps
- No. 14 Squadron Royal Flying Corps[38][39][40][41][42][43]
Order of Battle March
Eastern Force (Lieutenant General Sir C. M. Dobell)
Imperial Camel Corps Brigade (Brigadier General S. Smith)
- 1st (Australian) Battalion
- 2nd (British) Battalion
- 3rd (Australian) Battalion
- 4th (Anzac) Battalion[44]
52nd (Lowland) Division (Major General W. E. B. Smith)
- 155th (South Scottish) Brigade
- 1/4th Battalion, Royal Scots Fusiliers
- 1/5th Battalion, Royal Scots Fusiliers
- 1/4th Battalion, King's Own Scottish Borderers
- 1/5th Battalion, King's Own Scottish Borderers
- 1/4th Battalion, Royal Scots Fusiliers
- 156th (Scottish Rifles) Brigade
- 1/7th Battalion, Cameronians (Scottish Rifles)
- 1/8th Battalion, Cameronians (Scottish Rifles)
- 1/4th Battalion, Royal Scots
- 1/7th Battalion, Royal Scots
- 1/7th Battalion, Cameronians (Scottish Rifles)
- 157th (Highland Light Infantry) Brigade
- 1/5th Battalion, Highland Light Infantry
- 1/6th Battalion, Highland Light Infantry
- 1/7th Battalion, Highland Light Infantry
- 1/5th Battalion, Argyll and Sutherland Highlanders[45]
- 1/5th Battalion, Highland Light Infantry
- 155th (South Scottish) Brigade
54th (East Anglian) Division (Major General S. W. Hare)
161st (Essex) Brigade
- 1/4th Battalion, Essex Regiment
- 1/5th Battalion, Essex Regiment
- 1/6th Battalion, Essex Regiment
- 1/7th Battalion, Essex Regiment
- 1/4th Battalion, Essex Regiment
162nd (East Midland) Brigade
- 1/5th Battalion, Bedfordshire Regiment
- 1/4th Battalion, Northamptonshire Regiment
- 1/10th Battalion, London Regiment (Hackney)
- 1/11th Battalion, London Regiment (Finsbury Rifles)
- 1/5th Battalion, Bedfordshire Regiment
163rd (Norfolk and Suffolk) Brigade
- 1/4th Battalion, Norfolk Regiment
- 1/5th Battalion, Norfolk Regiment
- 1/5th Battalion, Suffolk Regiment
- 1/8th Battalion, Hampshire Regiment[46]
- 1/4th Battalion, Norfolk Regiment
74th (Yeomanry) Division (Major General E. S. Girdwood)
229th Brigade
- 16th Battalion, Devonshire Regiment
- 12th Battalion, Somerset Light Infantry
- 12th Battalion, Royal Scots Fusiliers
- 14th Battalion, Black Watch (Royal Highland Regiment)[47]
- 16th Battalion, Devonshire Regiment
- No. 7 Light Car Patrol
- Nos. 11 and 12 Armoured Motor Batteries
- 5th Wing Royal Flying Corps
- No. 1 Squadron Australian Flying Corps
- No. 14 Squadron Royal Flying Corps
Desert Column (Lieutenant General P. Chetwode)
53rd (Welsh) Division (Major General A. G. Dallas)
- 158th (North Wales) Brigade (Brigadier General H. A. Vernon)
- 1/5th Battalion, Royal Welsh Fusiliers
- 1/6th Battalion, Royal Welsh Fusiliers
- 1/7th Battalion, Royal Welsh Fusiliers
- 1/1st Battalion, Herefordshire Regiment
- 158th Brigade Machine Gun Company
- 1/5th Battalion, Royal Welsh Fusiliers
- 159th (Cheshire) Brigade (Brigadier General N. Money)
- 1/4th Battalion, Cheshire Regiment
- 1/7th Battalion, Cheshire Regiment
- 1/4th Battalion, Welch Regiment
- 1/5th Battalion Welch Regiment
- 159th Brigade Machine Gun Company
- 1/4th Battalion, Cheshire Regiment
- 160th (Welsh Border) Brigade (Brigadier General V. L. N. Pearson)
- 2/4th Battalion Royal West Surrey Regiment
- 1/4th Battalion, Royal Sussex Regiment
- 2/4th Battalion, Royal West Kent Regiment
- 2/10th Battalion, Middlesex Regiment
- 160th Brigade Machine Gun Company[48][49]
- 158th (North Wales) Brigade (Brigadier General H. A. Vernon)
- Anzac Mounted Division (Major General H. G. Chauvel)
2nd Light Horse Brigade (Brigadier General Granville Ryrie)
- 5th Light Horse Regiment
- 6th Light Horse Regiment
- 7th Light Horse Regiment
New Zealand Mounted Rifles Brigade (Brigadier General Edward Chaytor)
- Auckland Mounted Rifle Regiment
- Canterbury Mounted Rifle Regiment
- Wellington Mounted Rifle Regiment
- 22nd Mounted Yeomanry Brigade (Brigadier General Fryer)
- 1/1st Lincolnshire Yeomanry
- 1/1st Staffordshire Yeomanry
- 1/1st East Riding Yeomanry
- 1/1st Lincolnshire Yeomanry
- Imperial Mounted Division (less 4th Light Horse Brigade) (Major General Henry West Hodgson)
3rd Light Horse Brigade (Brigadier General Royston/L. C. Wilson)
- 8th Light Horse Regiment
- 9th Light Horse Regiment
- 10th Light Horse Regiment
- 5th Mounted Brigade (Brigadier General Percy Desmond FitzGerald)
- Royal Gloucestershire Hussars
- Warwickshire Yeomanry
- Worcestershire Hussars
- 6th Mounted Yeomanry Brigade (Lieutenant Colonel (temp. Brigadier General) T. M. S. Pitt/Brigadier General C. A. C. Godwin)
- Dorset Yeomanry
- Berkshire Yeomanry
- Royal Buckinghamshire Yeomanry
Artillery
- 53rd (Welsh) Division (3 Brigades RFA 12 18–pdrs=24 guns) 4 of each battery only = 16 guns; 4 4.5-inch howitzers = 8 howitzer
- 54th (East Anglian) Division (3 Brigades RFA 12 18–pdrs=24 guns) 4 of each battery only = 16 guns; 4 4.5-inch howitzers = 8 howitzer
- Anzac Mounted Division 4 Batteries RHA of 4 18–pdrs = 16 guns
- Imperial Mounted Division 4 Batteries RHA of 4 18–pdrs = 16 guns
- Imperial Camel Brigade 1 Camel Pack Battery of 6 2.75-inch = 6 guns
- Army Troops (3 Batteries of 4 60–pdrs=12 guns) one section only = 6 guns[50][51][52][53][Note 3]
Organization in April 1917
General Headquarters
- General Headquarters Troops
- Southern Canal Section
- Cyprus Detachment
- Southern Canal Section
- Eastern Force
- Force Troops
- Desert Column
- Northern Canal Section
- Delta and Western Force
- Alexandria District
1st Garrison Battalion, Essex Regiment at Khartoum[54]
Order of Battle April
General Headquarters
Commander in Chief Lieutenant General (temp. General) A. J. Murray
Eastern Force
GOC Major General (temp. Lieutenant General) C. M. Dobell
Brigadier General General Staff Brevet Lieutenant Colonel (temp. Brigadier General) G. P. Dawnay
- Force Troops
- Mounted Troops
- Imperial Camel Brigade GOC Major (temp. Brigadier General) C. L. Smith
- 1st (Australian and New Zealand) Battalion
- 2nd (Imperial) Battalion
- 3rd (Australian and New Zealand) Battalion
- Hong Kong and Singapore Camel Battery
- Brigade Signal Section
- Brigade Field Troop
- Brigade Machine Gun Company
- 1/1st Scottish Horse Field Ambulance
- Imperial Service Cavalry Brigade GOC Major (temp. Brigadier General) M. H. Henderson
- Mysore Lancers
- 1st Hyderabad Lancers
- Kathiwar Signal Troop
- 124th Indian Cavalry Field Ambulance
- Imperial Camel Brigade GOC Major (temp. Brigadier General) C. L. Smith
- Artillery
- XCVI Heavy Artillery Group (four 4-gun 60-pdr, one siege battery)
- Nos. 30, 38, 55, 85, 96 Anti-Aircraft Sections
- Machine Gune Corps
- "E" Company, Heavy Section (Tanks)
- Nos. 11 and 12 Light Armoured Car Batteries
- 17th Motor Machine Gun Battery
- Nos. 1 and 3 Armoured Trains
- Engineers
- 220th and 555th Army Troops Companies
- No. 10 Company (Kings's Own) Sappers and Miners
- 1/23rd and 2/23rd Sikh Pioneers
- 360th Company, RE (water unit)
- Signal Service
- GHQ Signal Company
- Pigeon Section
- N 14, N 15, N 23, N 24, No. 61 Airline Sections
- BR, NA, NB, NN Cable Sections
- No. 9 Wagon and London Pack W/T Sections
- Mounted Troops
52nd (Lowland) Division
GOC Brevet Colonel (temp. Major General) W. E. B. Smith
- 155th (South Scottish) Brigade
- 156th (Scottish Rifles) Brigade
- 157th (Highland Light Infantry) Brigade
- Artillery
- 261st Brigade RFA
- 262nd Brigade RFA
- 263rd Brigade RFA (troops same as April 1916 oob less cyclist company)
53rd (Welsh) Division
GOC Major General S. F. Mott
- 158th (North Wales) Brigade
- 159th (Cheshire) Brigade
- 160th (Welsh Border) Brigade
- Artillery
- 265th Brigade RFA
- 266th Brigade RFA
- 267th Brigade RFA
(troops same as April 1916 oob)
54th (East Anglian) Division
GOC Colonel (temp. Major General) S. W. Hare
- 161st (Essex) Brigade
- 162nd (East Midland) Brigade
- 163rd (Norfolk and Suffolk) Brigade
- Artillery
- 270th Brigade RFA
- 271st Brigade RFA
- 272nd Brigade RFA
(troops same as April 1916 oob)
74th (Yeomanry) Division
GOC Brevet Lieutenant Colonel (temp. Major General) E. S. Girdwood
229th Brigade
- 16th (R. 1st Devon and R. N. Devon Yeo Bn) Devonshire Regiment
- 12th (W. Somerset Yeo. Bn) Somerset Light Infantry
- 14th (Fife and Forfar Yeo. Bn) Royal Highlanders
- 12th (Ayr and Lanark Yeo Bn) Royal Scots Fusiliers
- 4th Machine Gun Company
230th Brigade
- 10th (Royal East Kent and West Kent Yeomanry) Battalion, Buffs (Royal East Kent Regiment)
- 16th (Sussex Yeo. Bn) Sussex Regiment
- 15th (Suffolk Yeo. Bn) Suffolk Regiment
- 12th (Norfolk Yeo. Bn) Norfolk Regiment
- 209th Machine Gun Company
- 10th (Royal East Kent and West Kent Yeomanry) Battalion, Buffs (Royal East Kent Regiment)
231st Brigade
- 10th (Shrop. and Chester Yeo. Bn) Shropshire Light Infantry
- 24th (Denbigh Yeo. Bn) Royal Welch Fusiliers
- 24th (Pemb. and Glam. Yeo. Bn) Welch Regiment
- 25th (Montgomery and Welsh Horse Yeo. Bn) Royal Welch Fusiliers
- 210th Machine Gun Company
- Divisional Troops
- Mounted Troops
- 1 Squadron 1/2nd County of London Yeomanry
- Engineers
- 5th Royal Monmouth Field Company RE
- 5th Royal Anglesey Field Company RE
- Signal Service
- 74th Divisional Signal Company
- ASC
- 74th Divisional Train
- Medical Units
- 229th, 230th, 231st Field Ambulances
- Mounted Troops
Desert Column
GOC Major General (temp. Lieutenant General) P. W. Chetwode
- Anzac Mounted Division GOC Colonel (temp. Major General) H. G. Chauvel
- 1st Australian Light Horse Brigade [Anzac Mounted Division] GOC Lieutenant Colonel C. F. Cox
- 1st Light Horse Regiment
- 2nd Light Horse Regiment
- 3rd Light Horse Regiment
- 1st Australian Light Horse Signal Troop
- 1st Australian Machine Gun Squadron
- 2nd Australian Light Horse Brigade GOC Colonel (temp. Brigadier General) G. de L. Ryrie
- 5th Light Horse Regiment
- 6th Light Horse Regiment
- 7th Light Horse Regiment
- 2nd Australian Light Horse Signal Troop
- 2nd Australian Machine Gun Squadron
- New Zealand Mounted Rifles Brigade GOC Brigadier General E. W. C. Chaytor
- Auckland Mounted Rifle Regiment
- Canterbury Mounted Rifle Regiment
- Wellington Mounted Rifle Regiment
- New Zealand Mounted Rifles Signal Troop
- New Zealand Machine Gun Squadron
- 22nd Mounted Brigade GOC Colonel (temp. Brigadier General) F. A. B. Fryer
- 1/1st Lincolnshire Yeomanry
- 1/1st Staffordshire Yeomanry
- 1/1st East Riding Yeomanry
- 22nd Mounted Brigade Signal Troop
- 18th Machine Gun Squadron
- 1st Australian Light Horse Brigade [Anzac Mounted Division] GOC Lieutenant Colonel C. F. Cox
Divisional Troops
- Artillery
- III (T.F.) Brigade RHA Leicester and Somerset Batteries
- IV (T.F.) Brigade RHA Inverness-shire and Ayrshire Batteries – no longer brigaded
- Mounted Divisional Ammunition Column
- Engineers
- 1st Australian Field Squadron
- Signal Service
- 1st Anzac Signal Squadron
- Army Service Corps (ASC)
- HQ, Light Horse Divisional ASC
- Nos 26 and 27 Australian Units of Supply
- Medical Units
- 1st, 2nd Light Horse and the 1/1st North Midland Mounted Brigade Field Ambulance
- NZ Mounted Brigade Ambulance
Imperial Mounted Division GOC Colonel (temp. Major General) H. W. Hodgson
- 3rd Light Horse Brigade GOC Colonel (temp. Brigadier General) J. R. Royston
- 8th Light Horse Regiment
- 9th Light Horse Regiment
- 10th Light Horse Regiment
- 3rd Australian Light Horse Signal Troop
- 3rd Australian Machine Gun Squadron
- 4th Light Horse Brigade GOC Lieutenant Colonel (temp. Brigadier General) J. B. Meredith
- 4th Light Horse Regiment
- 11th Light Horse Regiment
- 12th Light Horse Regiment
- 4th Australian Light Horse Signal Troop
- 4th Australian Machine Gun Squadron
- 5th Mounted Brigade GOC Colonel (temp. Brigadier General) E. A. Wiggin
- 1/1st Warwick Yeomanry
- 1/1st Gloucester Yeomanry
- 1/1st Worcester Yeomanry
- 5th Mounted Brigade Signal Troop
- 16th Machine Gun Squadron
- 6th Mounted Brigade GOC Lieutenant Colonel (temp. Brigadier General) T. M. S. Pitt
- 1/1st Buckinghamshire Yeomanry
- 1/1st Berkshire Yeomanry
- 1/1st Dorsetshire Yeomanry
- 6th Brigade Signal Troop
- 17th Machine Gun Squadron
- 3rd Light Horse Brigade GOC Colonel (temp. Brigadier General) J. R. Royston
- Divisional Troops
- Artillery
- 1/1st Nottinghamshire and 1/1st Berkshire Batteries RHA
- "A" and "B" Batteries, H.A.C.
- Mounted Divisional Ammunition Column
- Engineers
- Imperial Mounted Division Field Squadron
- Signal Service
- Imperial Mounted Division Signal Squadron
- ASC (unidentified)
- Medical Units
- 3rd and 4th Light Horse, 1/1st and 1/2nd South Midland Mounted Brigades Field Ambulances
- Artillery
Northern Canal Section
GOC Colonel (temp. Brigadier General) H. D. Watson commander of 20th Indian Brigade
- Mounted Troops
- 1/2nd County of London Yeomanry (less two squadrons)
- 16th Company Imperial Camel Corps (attached from 4th Battalion)
- Infantry
- 20th Indian Brigade (attached)
- Alwar Infantry (I.S.)
- Gwalior Infantry (I.S.)
- Patiala Infantry (I.S.)
- Signal Section
- 121st (Indian) Field Ambulance
- 20th Indian Brigade (attached)
- 1st Battalion British West Indies Regiment
- 2nd Battalion British West Indies Regiment
- 1st Garrison Battalion, Notts and Derby Regiment (two companies)
- 19th Garrison Battalion, Rifle Brigade
- Medical Units
- 1/1st Lowland Mounted Brigade Field Ambulance
Delta and Western Force
GOC Brevet Colonel (temp. Brigadier General) H. G. Casson
- Mounted Troops
- Bikanir Camel Corps
- Nos. 8 and 10 Companies Imperial Camel Corps
- "B" Squadron 1/2nd County of London Yeomanry (attached Imperial School of Instruction, Zeitoun)
- Infantry
- 2nd Garrison Battalion, Royal Welch Fusiliers
- 2/7th Battalion, Northumberland Fusiliers
- 6th Garrison Battalion, Royal Welch Fusiliers
- 20th Garrison Battalion, Rifle Brigade
- 21st Garrison Battalion, Rifle Brigade
- 22nd Garrison Battalion, Rifle Brigade
- 1st Garrison Battalion, Royal Warwickshire Regiment
- 1st Garrison Battalion, Devonshire Regiment
- 1st Garrison Battalion, Royal Irish Regiment
- 1 Coy, 3rd Infantry Battalion, Egyptian Army
- Artillery
- Detachment, Royal Marine Artillery (2 Naval 4-inch guns)
- No. 2 Armoured Train
- Detachments RFA dismounted (three 15-pdr, Q.F., two 15-pdr BLC, two 15-pdr Ehrhardt and two 9-pdr Krupp guns)
- Nos 1, 2, 3 Light Armoured Motor Batteries
- Six Light Car Patrols (Ford cars)
- Signal Service
- Western Force Signal Company
- No. 42 Airline Section
- UU Cable Section
- Pigeon Section (detachment)
- No. 6 Wagon and No. 6 Pack W/T Section
- ASC
- Mechanical transport
- 5th, 6th, 29th Reserve Field Ambulance and Workshop Units
- Western Force Mechanical Transport Supply Company
- Advanced M.T. Supply Depot (Samalut)
- No. 303 (M.T.) Company ASC
- Camel Transport
- "H" and "O" Companies, Egyptian Camel Transport Corps
- Mechanical transport
Alexandria District
GOC Colonel (temp. Brigadier General) R. C. Boyle
- Coast Defence Artillery
- No. 103rd Local Company, RGA
- Ras el Tin Fort
- Royal Malta Artillery (detachment)
- Quarantine and Chatby Batteries
- Mex Fort
- Infantry
- 5th [sic probably 3rd] Battalion, British West Indies Regiment
- 1st Garrison Battalion, Liverpool Regiment
- 2nd Garrison battalion, Cheshire Regiment
General Headquarters Troops
- Royal Flying Corps Middle East Brigade RFC GOC Brevet Lieutenant Colonel (temp. Brigadier General) W. G. H. Salmond
- 5th Wing
- Nos 14 and 67 (Australian) Squadrons
- 20th Reserve Wing
- Nos 21, 22, 23, 57, 58 Reserve Squadrons
- 5th Wing
- Engineers
- Railway Operating Division
- 115th and 116th Railway Companies RE
- 2 Companies Railway Battalion Sappers and Miners
- Topographical Section RE
- Railway Operating Division
- Signal Service
- "M" (L. of C.) Signal Company
- Nos 12 and 62 Airline Sections
- BQ, BS Cable Sections
- Northern Wagon, Southern Motor and No. 12 Pack W/T Sections
- ASC
- Mechanical transport
- HQ, ASC Motor Boat Company
- Two Advanced M.T. Sub Depots (Ismailia and Qantara)
- 52nd Highland Mounted Brigade, 6th Reserve and 29th Field Ambulance and Workshop Units
- Camel Transport
- Nos 1 and 2 Came Transport Depots
- "O" [sic] and "R" Companies, Egyptian Camel Transport Corps
- Mechanical transport
Southern Canal Section
GOC Brevet Colonel (temp. Brigadier General) P. C. Palin in addition to GOC 29th Indian Brigade
- Mounted Troops
- 4th (Australian and New Zealand) Battalion, Imperial Camel Corps (less 15th Coy, attached 3rd Battalion and 16th Coy attached Northern Canal Section with 13th Coy from 3rd Battalion attached)
- Engineers
- 14th Army Troops Company RE
- 496th (Kent) Field Company (less detachment)
- Infantry
232nd Brigade (first brigade of the yet to be formed 75th Division )
- 2nd Loyal North Lancashire
- 1/4th Duke of Cornwall's Light Infantry (both temporarily attached to Eastern Force)
- 1/5th Devonshire Regiment
- 2/5th Hampshire Regiment
- 29th Indian Brigade
- 2/3rd Gurkhas
- 3/3rd Gurkhas
- 123rd Rifles
- Brigade Signal Section
- 123rd Indian Field Ambulance
- Indian Brigade Supply Column
49th Indian Brigade
- 58th Rifles
- 1/101st Grenadiers
- 1/102nd Grenadiers
- 110th Indian Field Ambulance
- 1st Garrison Battalion Notts and Derby Regiment (less two companies)
- 1st Garrison Battalion, Northampton Regiment
- ASC
- No. 900 Company ASC (Axiliary Horse Transport Company, Ismailia)
Cyprus Detachment
- 1st Garrison Battalion Royal Scots
and Lines of Communications controlled by GHQ including RFC "X" Aircraft Park (5th Wing), "X" Aircraft Depot for all Middle East units RFC, Engineers, Signal Service, ASC, Medical Units, Ordnance, Veterinary, Remounts and Postal Units.[55]
Expansion of Desert Column June 1917
Desert Column was expanded to three divisions, commanded by Chauvel –
- Anzac Mounted Division commanded by Major General Chaytor
- 1st Light Horse Brigade
- 2nd Light Horse Brigade
- New Zealand Mounted Rifle Brigade
- 18th Brigade, Royal Horse Artillery (18 pounder guns)
- Australian Mounted Division commanded by Major General Hodgson
- 3rd Light Horse Brigade
- 4th Light Horse Brigade
- 5th Mounted Brigade
- 19th Brigade, Royal Horse Artillery (18 pounder guns)
- Yeomanry Mounted Division commanded by Major General G. de S. Barrow
- 6th Mounted Brigade
- 8th Mounted Brigade (recently arrived from Salonika)
- 22nd Mounted Brigade (recently arrived from Salonika)
- 20th Brigade, Royal Horse Artillery (13 pounder guns)
- Army Troops
- Imperial Camel Corps Brigade
- 7th Yeomanry Brigade (two regiments)
- an unidentified battery.[56]
At the end of June 1917 General Allenby took command. At that time the Egyptian Expeditionary Force consisted of the British XX Corps and the British XXI Corps, under the command of Lieutenant Generals Philip Chetwode and Edward Stanislaus Bulfin, respectively, along with the Desert Mounted Corps commanded by Lieutenant General Harry Chauvel. The air component was the Palestine Brigade of the Royal Flying Corps (later the Royal Air Force) and the Australian Flying Corps.[citation needed]
Order of Battle October
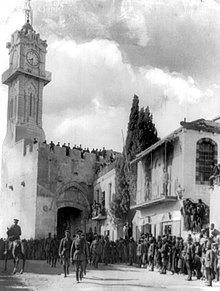
The commander of the Egyptian Expeditionary Force, General Sir Edmund Allenby entering the Holy City of Jerusalem on foot December 1917

British troops on parade at Jaffa Gate in December 1917 after the capture and occupation of Palestine.
XX Corps (Lieutenant General Sir R.W. Chetwode, Bart.)
10th (Irish) Division (Major General J.R. Longley)[Note 4]- 29th Brigade
- 30th Brigade
- 31st Brigade
- 53rd (Welsh) Division (Major General S.F. Mott)
- 158th (North Wales) Brigade
- 159th (Cheshire) Brigade
- 160th (Welsh Border) Brigade
60th (2/2nd London) Division (Major General J.S.M. Shea)
- 179th (2/4th London) Brigade
- 180th (2/5th London) Brigade
- 181st (2/6th London) Brigade
74th (Yeomanry) Division (Major General E.S. Girdwood)
- 229th Brigade
- 230th Brigade
- 231st Brigade
- Corps Cavalry Regiment – 1/2nd County of London Yeomanry
- Corps Artillery – 96th Heavy Artillery Group
XXI Corps (Lieutenant General Sir E.S. Bulfin)
- 52nd (Lowland) Division (Major General J. Hill)
- 155th (South Scottish) Brigade
- 156th (Scottish Rifles) Brigade
- 157th (Highland Light Infantry) Brigade
- 54th (East Anglian) Division (Major General S.W. Hare)
- 161st (Essex) Brigade
- 162nd (East Midland) Brigade
- 163rd (Norfolk and Suffolk) Brigade
75th Division(Major General P.C. Palin)
- 232nd Brigade
- 233rd Brigade
- 234th Brigade
- Corps Cavalry Regiment – Composite Yeomanry Regt.
- Corps Artillery – 97th, 100th, 102nd Heavy Artillery Groups
- 20th Indian Brigade (Brigadier General H.D. Watson)
Desert Mounted Corps (Lieutenant General Sir H. Chauvel)
- Anzac Mounted Division (Major General E.W.C. Chaytor)
- 1st Light Horse Brigage (Brigadier General C. F. Cox)
- 1st, 2nd and 3rd Australian Light Horse Regiments
- 2nd Light Horse Brigade (Brigadier General G. de L. Ryrie)
- 5th, 6th and 7th Australian Light Horse Regiments
- New Zealand Mounted Rifle Brigade (Brigadier General W. Meldrum)
- Auckland, Canterbury and Wellington Mounted Rifle Regiments
18th Brigade RHA (Inverness-shire, Ayrshire and Somerset Batteries) of 13–pounder guns and Divisional Ammunition Column
- 1st Light Horse Brigage (Brigadier General C. F. Cox)
- Australian Mounted Division (Major General Henry W. Hodgson)
- 3rd Light Horse Brigade (Brigadier General L. C. Wilson)
- 8th, 9th and 10th Australian Light Horse Regiments
- 4th Light Horse Brigade (Brigadier General W. Grant)
- 4th, 11th and 12th Australian Light Horse Regiments
- 5th Mounted Brigade (Brigadier Generals Percy Desmond FitzGerald/P. J. V. Kelly)
- Gloucestershire Husssars, Warwickshire and Worcestershire Yeomanry Regiments
19th Brigade RHA (A and B Batteries Honourable Artillery Company and Notts Battery RHA) of 13–pounder guns and Divisional Ammunition Column
- 3rd Light Horse Brigade (Brigadier General L. C. Wilson)
- Yeomanry Mounted Division (Major General G. de S. Barrow)
- 6th Mounted Brigade (Brigadier General C. A. C. Godwin)
- Dorset, Bucks and Berks Yeomanry Regiments
- 8th Mounted Brigade (Brigadier General C. S. Rome)
- 1st City of London and 1st and 3rd County of London Yeomanry Regiments
- 22nd Mounted Brigade (Brigadier General P. D. FitzGerald)
- Stafford, Lincoln and East Riding Yeomanry Regiments
20th Brigade RHA (Berkshire, Hampshire and Leicestershire Batteries) of 13–pounder guns and Divisional Ammunition Column
- 6th Mounted Brigade (Brigadier General C. A. C. Godwin)
- Corps Reserve
7th Mounted Brigade (Brigadier General J. T. Wigan)
- Sherwood Rangers, South Notts and Herts Yeomanry Regiments with the Essex Battery RHA and Brigade Ammunition Column
- Imperial Camel Corps Brigade (Brigadier General C. L. Smith)
- 2nd (British) Battalion
- 3rd (Australian and New Zealand) Battalion
- 4th (Australian and New Zealand) Battalion
- Hong Kong and Singapore Camel Battery RGA.[52][57][58][Note 5]

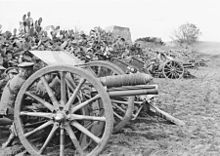
British 18-pounders as used until September 1917
On establishment in 1916 and 1917, the first two mounted divisions had been supplied with 18–pounder artillery guns. In September 1917 these guns were replaced with 13-pounders, making the divisions "even more capable", according to Erickson.[56][58][59]
HAC 13-pounders in March 1918
- General Headquarters Troops
- Army Cavalry
- Imperial Service Cavalry Brigade (Major (temp. Brigadier General) M. H. Henderson)
- Jodhpur Lancers
- Mysore Lancers
- 1st Hyderabad Lancers
- Kathiwar Signal Troop
- 124th Indian Cavalry Field Ambulance.[60]
- Imperial Service Cavalry Brigade (Major (temp. Brigadier General) M. H. Henderson)
- Army Cavalry
- Royal Flying Corps, Middle East (Brigadier General W. G. H. Salmond to 5 November then Brigadier General W. S. Brancker to 3 January 1918 when Salmond returned)
- Palestine Brigade (composite Royal Flying Corps RFC and Australian Flying Corps (AFC) (Lieutenant Colonel A. E. Borton) operational from 27 October to 7 November 1917)
- 5th (Artillery Corps) Wing at Deir el Belah
- No. 14 Squadron RFC at Deir el Belah and allotted to XXI Corps
- No. 113 Squadron RFC at Sheikh Nuran (2 flights allotted to XX Corps; 1 flight to Desert Mounted Corps)[Note 6]
- No. 21 Kite Balloon Company[Note 7] consisting of –
- No. 49 Kite Balloon Section at Sheikh Shabasi
- No. 50 Kite Balloon Section at Wadi Ghuzze.
- 40th (Army) Wing Headquarters at Deir el Belah
- No. 11 Squadron RFC at Deir el Belah
- No. 67 Squadron (No. 1 Squadron Australian Flying Corps) at Shiekh Nuran. (A special squadron was formed from the 20th Training Wing at Aboukir on 24 October for duty at Nuran under the direct orders of the Palestine Brigade for operations consisting of bombing raids on enemy camps, dumps, trench works and battery positions.)
- Aircraft Park – "X" Aircraft Park at Abbassia with an advanced stores section at Kantara was responsible for the supplies to the RFC in Palestine.[57][61]
- 5th (Artillery Corps) Wing at Deir el Belah
- Palestine Brigade (composite Royal Flying Corps RFC and Australian Flying Corps (AFC) (Lieutenant Colonel A. E. Borton) operational from 27 October to 7 November 1917)
- Royal Flying Corps, Middle East (Brigadier General W. G. H. Salmond to 5 November then Brigadier General W. S. Brancker to 3 January 1918 when Salmond returned)
Also in General Headquarters Troops were the
- VIII Mountain Brigade RGA (10th and 11th Batteries of 3.7inch howitzers)
- IX Mountain Brigade RGA of "A" and "B" Batteries of 2.75 inch howitzers and the 12th Battery of 3.7 inch howitzers.[61][Note 8]
1918
The force initially consisted mostly of British and Egyptian troops, but most of the former were sent to the Western Front in early 1918 to help repel Germany's Spring Offensive. In the meantime, new troops were then dispatched from India, Australia, and New Zealand, in particular who made up a large portion of the army. Though it was feared that mostly Muslim Indian troops might desert and join Ottoman Empire forces in the region (who had declared a jihad against the Allies early in the war), this fear proved unfounded, as the Indians fought valiantly on the front lines of most of the army's major engagements. The force also included a small contingent of French and Italian troops. The forces of the Arab Revolt, led by Prince Feisal of Mecca, were also unofficially attached during Allenby's Damascus offensive.[citation needed]

The force also included contingents of Armenian soldiers
The force's role evolved from a defense of Egypt to the invasion of Palestine which involved: the capture of Beersheba and Gaza in October–November 1917 (see Third Battle of Gaza), entering Jerusalem on December 11, 1917, and Allenby's successful campaign of 1918, resulting in the defeat of the Turks at Megiddo, and the capture of Damascus, Beirut, and Aleppo. The force's successes ultimately led to Turkey's exit from the war and the creation of the British Mandate of Palestine.[citation needed]
The Palestine Brigade RAF was reorganised at the end of 1917 or during the summer of 1918, as follows:
- 5th (Corps) Wing
- No. 14 Squadron RAF
- No. 113 Squadron RAF
- No. 142 Squadron RAF
- 40th (Army) Wing
- No. 111 Squadron RAF
- No. 144 Squadron RAF
- No. 145 Squadron RAF
- No. 1 Squadron AFC
- No. 21 Balloon Company
- Nos 49, 50, 57 Balloon Section[62]
Deployment, 9 February
- General Headquarters at Bir Salem
- 7th Mounted Brigade at Deir el Belah
- Imperial Service Cavalry Brigade at Herbieh
- Imperial Camel Brigade at Rafa
- 20th Indian Brigade at Gaza
- Desert Mounted Corps at Kh. Deiran
- Anzac Mounted Division at Richon le Zion (Ayun Kara)
- Australian Mounted Division at Deir el Belah
- Yeomanry Mounted Division at Deir el Belah
- XX Corps at Mount of Olives
- 10th (Irish) Division at O99, P.20.d. place not named.
- 53rd (Welsh) Division at Ram Allah
- 60th (London) Division at Jerusalem
- 74th (Yeomanry) Division at Latron
- XXI Corps at Jaffa
- 52nd (Lowland) Division at Jaffa and Sarona
- 54th (East Anglian) Division at Wilhelma
- 75th Division at Ramleh.[63]
- 52nd (Lowland) Division at Jaffa and Sarona
Shea's Force March
- 60th (London) Division
- Anzac Mounted Division
- Imperial Camel Corps Brigade including the Hong Kong and Singapore Mountain Battery, with four BL 2.75 inch Mountain Guns, (firing 12-pounder shells) :the 10th Heavy Battery Royal Garrison Artillery (RGA)
- one Light Armoured Car Brigade
- Army Bridging Train
- Desert Mounted Corps Bridging Train and pontoon units.[64][65][66][67][Note 9]
Order of Battle April
- Desert Mounted Corps (GOC Lieutenant General H. G. Chauvel)
- 60th (London) Division commanded by Major General John Shea (less the 181st Brigade in reserve on the XXth Corps front)
- 179th Brigade (Brigadier General FitzJ. M. Edwards)
- 2/13th London Regiment
- 2/14th London Regiment
- 2/15th London Regiment
- 2/16th London Regiment
- 2/13th London Regiment
- 180th Brigade (Brigadier General C. F. Watson)
- 2/17th London Regiment
- 2/18th London Regiment
- 2/19th London Regiment
2/20th London Regiment
- Artillery 301st, 302nd, 303rd Brigades RFA
- 20th Indian Brigade (Brigadier General E. R. B. Murray)
- Alwar Infantry (I.S.)
- Patiala Infantry (I.S.)
- Gwalior Infantry (I.S.)
- 110th Mahratta L. I. Regiment
- 179th Brigade (Brigadier General FitzJ. M. Edwards)
- Anzac Mounted Division (GOC Major General E. W. C. Chaytor)
- 2nd Light Horse Brigade (Brigadier General G. de L. Ryrie)
- 5th Light Horse Regiment
- 6th Light Horse Regiment
- 7th Light Horse Regiment
- New Zealand Mounted Rifles Brigade (Brigiadier General W. Meldrum)
- Auckland Mounted Rifles Regiment
- Canterbury Mounted Rifles Regiment
- Wellington Mounted Rifles Regiment
- Divisional Artillery XVIII Brigade RHA (Inverness-shire, Ayrshire and Somerset Batteries)
- 2nd Light Horse Brigade (Brigadier General G. de L. Ryrie)
- Australian Mounted Divisions (GOC Major General H. W. Hodgson)
- 1st Light Horse Brigade (Brigadier General C. F. Cox) (Anzac Mounted Division)
- 1st Light Horse Regiment
- 2nd Light Horse Regiment
- 3rd Light Horse Regiment
- 3rd Light Horse Brigade (Brigadier General L. C. Wilson)
- 8th Light Horse Regiment
- 9th Light Horse Regiment
- 10th Light Horse Regiment
- 4th Light Horse Brigade (Brigadier General W. Grant)
- 4th Light Horse Regiment
- 11th Light Horse Regiment
- 12th Light Horse Regiment
- 5th Mounted Brigade (Brigadier General P. J. V. Kelly)
- 1/1st Gloucester Yeomanry Regiment
- 1/1st Worcester Yeomanry Regiment
- 1/1st Sherwood Rangers Regiment (7th Mounted Yeomanry Brigade)
- Divisional Artillery XIX Brigade RHA (Notts. Battery RHA, "A" and "B: Batteries HAC with Hong Kong Mountain Battery attached)
- 1/1st Dorset Yeomanry Regiment (6th Mounted Yeomanry Brigade)
- 1/1st County of London (Middlesex) Yeomanry Regiment (8th Mounted Yeomanry Brigade)
- 1st Light Horse Brigade (Brigadier General C. F. Cox) (Anzac Mounted Division)
- Imperial Service Cavalry Brigade
- Jodhpur Lancers
- Mysore Lancers
- Hyderabad Lancers
- 11th and 12th Light Armoured Motor Batteries [LAMB] (Machine Gun Corps)
West of the Jordan
- Imperial Camel Corps Brigade (Brigadier General C. L. Smith)
- 2nd (British) Battalion
- 3rd (Australian) Battalion
- 4th (ANZAC) Battalion
- Artillery Singapore Mountain Battery less Hong Kong Mountain Battery
- 22nd Mounted Brigade (Brigadier General F. A. B. Fryer/Brigadier General P. D. FitzGerald)
- 1/1st Lincolnshire Yeomanry Regiment
- 1/1st Staffordshire Yeomanry Regiment
- 1/1st East Riding Yeomanry Regiment[68]
- Imperial Camel Corps Brigade (Brigadier General C. L. Smith)
Order of Battle 19 September
XX Corps (Lieutenant General Sir P. Chetwode)
- 53rd (Welsh) Division (Major General S. F. Mott)
- 158th Brigade (Brigadier General H. A. Vernon)
- 5/6th R. Welsh Fus., 4/11th Gurkhas, 3/153rd and 154th Indian Inf.
- 159th Brigade (Brigadier General N. Money)
- 4/5th Welsh Regt., 3/152nd, 1/153rd and 2/153rd Indian Inf.
- 160th Brigade (Brigadier General V. L. N. Pearson)
- 1/7th R. Welsh Fus., 1/17th Indian Inf., 1/21st Punjabis, 1st Cape Corps
- 265th, 266th, 267th Brigades RFA each with three batteries of twelve 18-pdrs. and four 4.5-inch hows.
- 39th Indian Mountain Battery
- Troop Corps Cavalry Regiment (1/1st Worcester Yeomanry)
- 158th Brigade (Brigadier General H. A. Vernon)
- 10th (Irish) Division (Major General J. R. Longley)
- 29th Brigade (Brigadier General C.L. Smith)
- 1st Leinsters, 1/101st Grenadiers, 1/54th Sikhs, 2/151st Infantry
- 30th Brigade (Brigadier General F. A. Greer)
- 1st Royal Irish Regt., 1st Kashmir I.S. Rifles, 38th Dogras, 46th Punjabis
- 31st Brigade (Brigadier General E. M. Morris)
- 2nd Royal Irish Fus., 2/101st Grenadiers, 74th Punjabis, 2/42nd Deolis
- 67th, 68th, 263rd Brigades RFA (67th and 68th Brigades with three batteries of twelve 18-pdrs. and four 4.5-inch hows.; 263rd Brigade with six 18-pdrs. and four 4.5-inch hows.)
- Hong Kong and Singapore Mountain Battery
- 29th Brigade (Brigadier General C.L. Smith)
- "Watson's Force" (holding centre of XX Corps' Front)
- Corps Cavalry Regiment (1/1 Worcester Yeomanry)
- Pioneer Battalions (2/155th and 1/155th) of 10th and 53rd Divisions
- Corps Reinforcement Detachment (700 strong)
- XX Corps Heavy Artillery
- For support of 53rd Division
- 103rd Brigade RGA
- R. Section 10th Heavy Battery
- L. Section 10th Heavy Battery
- 205th Siege Battery
- 387th Siege Battery (less 1 gun)
- 392nd Siege Battery
- For support of 10th Division
- 421st Siege Battery
- 397th Siege Battery (1 gun)
- 2 captured 15 cm hows.
- 2 captured 105 mm hows
- 3 captured 75 mm hows.
XXI Corps (Lieutenant General Sir E. Bulfin)
3rd (Lahore) Division (Major General A.R. Hoskins)
- 7th Brigade (Brigadier General S. R. Davidson)
- 1st Connaught Rngrs, 2/7th Gurkha Rifles, 27th and 91st Punjabis
- 8th Brigade (Brigadier General S. M. Edwardes)
- 1st Manchester Regt., 27th Sikhs, 59th Scinde Rifles, 2/124th Baluchistan Infantry
- 9th Brigade (Brigadier General C. C. Luard)
- 2nd Dorsets, 1/1st Gurkha Rifles, 93rd Infantry, 105th Mahratta Light Infantry
- 4th, 8th, 53rd Brigades RFA, each with twelve 18-pdrs. and four 4.5-inch hows.
- 7th Brigade (Brigadier General S. R. Davidson)
7th (Meerut) Division (Major General Sir V. B. Fane)
- 19th Brigade (Brigadier General G. S. Weir)
- 1st Seaforth Highrs., 28th and 92nd Punjabis, 125th Napier's Rifles
- 21st Brigade (Brigadier General A. G. Kemball)
- 2nd Black Watch, 1st Guides Infantry, 20th Punjabis, 1/8th Gurkha Rifles
- 28th Brigade (Brigadier General C. H Davies)
- 2nd Leicesters, 51st and 53rd Sikhs, 56th Punjabi Rifles
- 261st, 262nd, 264th Brigades RFA, each with twelve 18-pds and four 4.5-inch hows.
- 19th Brigade (Brigadier General G. S. Weir)
- 54th (East Anglian) Division (Major General S. W. Hare)
- 161st (Essex) Brigade (Brigadier General A. B. Orpen Palmer)
- 1/4th, 1/5th, 1/6th and 1/7th Essex
- 162nd (East Midland) Brigade (Brigadier General A. Mudge)
- 1/5th Bedford, 1/4th Nothampton, 1/10th and 1/11th London
- 163rd (Norfolk and Suffolk) Brigade (Brigadier General A. J. MacNeill)
- 1/4th, 1/5th Norfolk, 1/5th Suffolk, 1/8th Hampshire
- 270th, 271st, 272nd Brigades RFA, each with twelve 18-pds and four 4.5-inch hows.
- 161st (Essex) Brigade (Brigadier General A. B. Orpen Palmer)
- 60th (London) Division (Major General Sir J. S. M. Shea)
- 179th Brigade (Brigadier General E. T. Humphreys)
- 2/13th London, 3/151st Infantry, 2/19th Punjabis, 2/137th Baluchis
- 180th Brigade (Brigadier General C. F. Watson)
- 2/19th London, 2nd Guides, 2/30th Punjabis, 1/50th Kumoan Rifles
- 181st Brigade (Brigadier General E. C. da Costa)
- 2/22nd London, 130th Baluchis, 2/97th Deccan Inf., 2/152nd Infantry.[69][70]
- 2/22nd London, 130th Baluchis, 2/97th Deccan Inf., 2/152nd Infantry.[69][70]
- 179th Brigade (Brigadier General E. T. Humphreys)
- 75th Division (Major General P. C. Palin)
- 232nd Brigade (Brigadier General H. J. Huddleston)
- 1/4th Wilts, 72nd Punjabis, 2/3rd Gurkhas, 3rd Kashmir I.S. Infantry
- 233rd Brigade (Brigadier General E. M. Colston)
- 1/5th Somerset Light Infantry, 29th Punjabis, 3/3rd Gurkhas, 2/154th Infantry
- 234th Brigade (Brigadier General C. A. H. Maclean)
- 1/4th D.C.L.I., 123rd Outram Rifles, 58th Vaughan's Rifles, 1/152nd Infantry.[71][72][73]
- 1/4th D.C.L.I., 123rd Outram Rifles, 58th Vaughan's Rifles, 1/152nd Infantry.[71][72][73]
- 301st, 302nd 303rd Brigades RFA, each with twelve 18-pdrs. and four 4.5- hows.
5th Light Horse Brigade (under orders of 60th Division)- French Palestine Contingent (4 Bns and 3 Btys)[71][74]
- Corps mounted troops (Composite Yeomanry Regiment)
- 232nd Brigade (Brigadier General H. J. Huddleston)
- XXI Corps Heavy Artillery
- Sub-Group under the Right Group
- 4.7-inch Battery RGA
- 300 SB, RGA 6-inch Section
- 334 SB, RGA, One Section
- Right Group
- 100th Brigade, RGA, Headquarters –
- 15th HB, RGA
- 134 SB, RGA
- 334 SB, RGA One Section
- 43 SB, RGA "Bessie"
- Right Centre Group
- 95th Brigade, RGA Headquarters –
- 181 HB, RGA
- 304 SB, RGA
- 314 SB, RGA
- 383 SB, RGA
- 422 SB, RGA
- 5.9-inch Hows. Section.
- Left Centre Group
- 102nd Brigade, RGA Headquarters –
- 91 HB, RGA
- 209 SB, RGA
- 380 SB, RGA
- 440 SB, RGA
- 300 SB, RGA 8 inch Section
- 43 SB, RGA "Lizzie"
- Left Group
- 96th Brigade, RGA Headquarters –
- 189 HB, RGA
- 202 HB, RGA
- 378 SB, RGA
- 394 SB, RGA
Generally –
- The Sub-Group was in support of the French
- The Right Group was in support of the 54th Division
- The Right Centre Group was in support of the 3rd (Lahore) Division
- The Left Centre Group was in support of the 75th Division
- The Left Group was in support of the 60th Division.[75]
Desert Mounted Corps (Lieutenant General Sir H. Chauvel)
4th Cavalry Division (Major General Sir G. de S. Barrow)
- 10th Cavalry Brigade (Brigadier General Wilfrith Gerald Key Green/Richard Howard-Vyse)
- 1/1 Dorset Yeomanry (ex 6th Mounted Brigade), 2nd Lancers, 38th Central India Horse (38th King George's Own Central India Horse)
- 11th Cavalry Brigade (Brigadier General Charles Levinge Gregory)
- 1/1st County of London Yeomanry (ex 8th Mounted Brigade), 29th Lancers, 36th Jacob's Horse
- 12th Cavalry Brigade (Brigadier General J. T. Wigan)
- 1/1Stafford Yeomanry (ex 22nd Mounted Brigade), 6th Cavalry, 19th Lancers
- 20th Brigade RHA and Divisional Ammunition Column
- 12th LAM Battery
- No. 7 Light Car Patrol
- 10th Cavalry Brigade (Brigadier General Wilfrith Gerald Key Green/Richard Howard-Vyse)
5th Cavalry Division (Major General H. J. M. MacAndrew)
- 13th Cavalry Brigade (Brigadier General Philip James Vandeleur Kelly)
- 1/1 Gloucester Yeomanry (ex 5th Mounted Brigade), 9th Hodson's Horse, 18th Lancers
- 14th Cavalry Brigade (Brigadier General Goland Vanhalt Clarke)
- 1/1 Sherwood Rangers Yeomanry (ex 7th Mounted Brigade), 20th Deccan Horse, 34th Poona Horse
- 15th (Imperial Service) Cavalry Brigade (Brigadier General Cyril Rodney Harbord)
- Jodhpur, Mysore and 1st Hyderabad Lancers [Regiments] (These regiments were all maintained by the Ruling Princes of their respective States in India.)
- 'B' Battery HAC and Essex Battery RHA with Divisional Ammunition Column
- 11th LAM Battery
- No. 1 Light Car Patrol.[76][77]
- 13th Cavalry Brigade (Brigadier General Philip James Vandeleur Kelly)
- Australian Mounted Division (Major General H. W. Hodgson)
- 3rd Light Horse Brigade (Brigadier General L. C. Wilson)
- 8th, 9th, 10th Australian Light Horse Regiments
- 4th Light Horse Brigade (Brigadier General W. Grant)
- 4th, 11th 12th Light Horse Regiments[78]
- 4th, 11th 12th Light Horse Regiments[78]
- 5th Light Horse Brigade (Brigadier General C. Macarthur Onslow) (attached XXI Corps till 22 September)
- 14th, 15th Light Horse Regiments (ex Imperial Camel Corps Brigade)
- 16th Regiment Mixte de Marche de Palestine et Syrie (French Régiment Mixte de Cavalerie)
- French Chasseurs d'Afrique (2 squadrons)
Spahis (1 squadron).[79][80][81]
- 19th Brigade RHA.[82]
- 3rd Light Horse Brigade (Brigadier General L. C. Wilson)
Chaytor's Force (Major General E.W.C. Chaytor)
- 20th Indian Brigade
- Four Indian Battalions
- 1st Battalion British West Indies Regiment
- 2nd Battalion British West Indies Regiment
- 38th Battalion Royal Fusiliers (Jewish Battalion)
- 39th Battalion Royal Fusiliers (Jewish Battalion)[71][83][84][85]
- Anzac Mounted Division (Major General E.W.C. Chaytor)
- 1st Light Horse Brigage (Brigadier General C. F. Cox)
- 1st, 2nd and 3rd Light Horse Regiments
- 2nd Light Horse Brigade (Brigadier General G. de L. Ryrie)
- 5th, 6th and 7th Light Horse Regiments
- New Zealand Mounted Rifle Brigade (Brigadier General W. Meldrum)
- Auckland, Canterbury and Wellington Mounted Rifle Regiments
- 18th Brigade RHA (Inverness-shire, Ayrshire and Somerset Batteries) and Divisional Ammunition Column[86]
- A/263 Battery RFA
- 195th Heavy Battery RGA
- 29th and 32nd Indian Mountain Batteries
- No. 6 (Medium) Trench Mortar Battery
- 3 anti–aircraft sections RA
- Detachment No. 35 AT Company RE.[87]
- 1st Light Horse Brigage (Brigadier General C. F. Cox)
See also
- Sinai and Palestine Campaign
- History of Palestine
- Postage stamps and postal history of Palestine
Notes
^ The names of the infantry divisions, brigades and battalions and some other units have, in many cases, been changed so they no longer reflect the names of these units as they appear in the sources quoted. Additional names of units have been added without citation.
^ This could be the 3rd Battalion mentioned in Falls EEF April 1916 order of battle. [Falls 1930 Vol. 1 p. 389] However in his EEF April 1917 order of battle he again mentions only the 1st 2nd and 5th Battalions. [Falls 1930 Vol. 1 pp. 402, 404]
^ The third brigades of 53rd and 54th Divisions were in the Suez Canal Defences with 1st Light Horse Brigade about Bir el Abd, Mazar and Bardawil patrolling the pipeline until moving to El Arish on 20 March. And only four guns of each 18–pounder battery of the 53rd and 54th Divisions, and one section of each heavy battery were brought across the Sinai Peninsula. The guns left behind formed part of the Suez Canal Defences. [Wavell 1968, p. 94, 1st Light Horse Brigade War Diary March 1917 AWM4-10-1-32]
^ Nominally Army Troops. [Keogh 1955 p. 135]
^ Keogh notes the 7th Mounted Brigade had only two regiments. He places six squadrons of Indian Imperial Service troops, one West Indies battalion, French and Italian contingents in Army Troops, totalling 3,000. He also places the Imperial Camel Corps Brigade in Desert Mounted Corps. [Keogh 1955 p. 135]
^ Shown as No. 113 Squadron in Falls 1930 Vol. 2 p. 666
^ Shown as part of the 40th Wing by Falls 1930 Vol. 2 p. 666
^ The 7th Mounted Brigade and the Imperial Camel Corps Brigade had been attached to Desert Mounted Corps and the 10th Division attached to the XX Corps. [Falls 1930 Vol. 2 p. 666]
^ Blenkinsop refers to the 60th Indian Division but the Londoners did not leave for the Western Front until after the Second Transjordan attack.
References
^ Bruce 2002, p. 34
^ Keogh 1955, p. 32
^ Wavell 1968, p. 41
^ Falls 1930 Vol. 1 pp. 69–204
^ Falls 1930 Vol. 1 pp. 242–350
^ Falls 1930 Vol. 1 pp. 351–372, Vol. 2 pp. 1–43
^ Falls 1930 Vol. 2 pp. 44–647
^ ab Keogh 1955, p. 34
^ ab Powles 1922, pp. 12, 29–35, 278–9
^ ab Wavell 1968, pp. 92–3, 139–41
^ ab Woodward 2006, p. 53
^ "Sinai and Palestine" (PDF). Australian War Memorial. p. 68. Retrieved 30 November 2011..mw-parser-output cite.citation{font-style:inherit}.mw-parser-output q{quotes:"""""""'""'"}.mw-parser-output code.cs1-code{color:inherit;background:inherit;border:inherit;padding:inherit}.mw-parser-output .cs1-lock-free a{background:url("//upload.wikimedia.org/wikipedia/commons/thumb/6/65/Lock-green.svg/9px-Lock-green.svg.png")no-repeat;background-position:right .1em center}.mw-parser-output .cs1-lock-limited a,.mw-parser-output .cs1-lock-registration a{background:url("//upload.wikimedia.org/wikipedia/commons/thumb/d/d6/Lock-gray-alt-2.svg/9px-Lock-gray-alt-2.svg.png")no-repeat;background-position:right .1em center}.mw-parser-output .cs1-lock-subscription a{background:url("//upload.wikimedia.org/wikipedia/commons/thumb/a/aa/Lock-red-alt-2.svg/9px-Lock-red-alt-2.svg.png")no-repeat;background-position:right .1em center}.mw-parser-output .cs1-subscription,.mw-parser-output .cs1-registration{color:#555}.mw-parser-output .cs1-subscription span,.mw-parser-output .cs1-registration span{border-bottom:1px dotted;cursor:help}.mw-parser-output .cs1-hidden-error{display:none;font-size:100%}.mw-parser-output .cs1-visible-error{font-size:100%}.mw-parser-output .cs1-subscription,.mw-parser-output .cs1-registration,.mw-parser-output .cs1-format{font-size:95%}.mw-parser-output .cs1-kern-left,.mw-parser-output .cs1-kern-wl-left{padding-left:0.2em}.mw-parser-output .cs1-kern-right,.mw-parser-output .cs1-kern-wl-right{padding-right:0.2em}
^ Bruce 2002, pp. 38–9
^ "Imperial Camel Corps". Australian War Memorial. Retrieved 13 January 2012.
^ Cutlack 1941, pp. 32
^ Falls 1930 Vol. 1 Appendix 2 p. 395
^ Falls 1930 Vol. 1 Appendix 2 pp. 380–394
^ Falls 1930 Vol. 1 p. 203
^ Bruce 2002, pp.43–4
^ Keogh 1955, p. 53–4
^ Falls 1930 Vol. 1 p. 244
^ Wavell, 1968, p. 69
^ Powles 1922, p. 47
^ Falls 1930 Vol. 1 p. 381
^ McGuirk 2007, pp. 260–1, 263–4
^ Carver 2003 pp. 186–8
^ Bowman–Manifold 1923, p. 23
^ Anzac MD WD AWM4-1-60-10 Appendix 24 pp. 3–7
^ ab Cutlack 1941, pp. 45–9
^ Powles 1922, pp. 48–9 Map of Magdhaba & 278-9
^ Woodward 2003, p. 53
^ Bou 2009, pp. 150–2
^ Hill 1978, p. 67
^ Kinloch 2007, pp. 57–8
^ Powles 1922, p. 12
^ Falls 1930 Vol. 1 p. 276
^ ab Falls 1930 Vol. 1 p. 275
^ Bruce 2002 p. 85
^ Cutlack 1941, pp. 45–9, 51
^ Gullett 1941, pp. 230–1
^ Keogh 1955, p. 77
^ Powles 1922, p. 65
^ Coulthard-Clark 1998, p. 123
^ "Imperial Camel Corps". Australian War Memorial. Retrieved 10 December 2011.
^ "The 52nd (Lowland) Division in 1914–1918". Long Long Trail. Retrieved 10 December 2011.
^ "The 54th (East Anglian) Division in 1914–1918". Long Long Trail. Retrieved 10 December 2011.
^ "The 74th (Yeomanry) Division in 1914–1918". Long Long Trail. Retrieved 10 December 2011.
^ "The 53rd (Welsh) Division in 1914–1918". Long Long Trail. Retrieved 10 December 2011.
^ Falls 1930 Vol. 1 pp. 390, 398
^ Wavell 1968, pp. 92–4
^ Powles 1922, pp. 278–9
^ ab Preston 1921, pp. 331–3
^ Falls 1930 Vol. 1 p. 402
^ Falls 1930 Vol. 1 Appendix 3 p. 407
^ Falls 1930 Vol. 1 Appendix 3 pp. 396–406, Vol. 2 Appendix 2 pp. 660–666
^ ab Keogh 1955 pp. 125–6
^ ab Wavell 1968, pp. 139–41
^ ab Erickson 2007 p. 112
^ Powles 1922 p. 28
^ Blenkinsop 1925 pp. 199–200
^ ab Falls 1930 Vol. 2 p. 666
^ Cutlack 1941 p. 68
^ GS, GHQ, EEF War Diary AWM4, 1-6-22 pp.18–9
^ Woodward 2006 p. 163
^ Blenkinsop 1925 p. 224
^ Keogh 1955 p. 212
^ Powles 1922 p. 202
^ Falls 1930 Vol. 2 pp. 365, 368, 660–2, 673
^ Wavell 1968, p. 217-8
^ Massey 1920, pp. 339–40
^ abc Keogh 1955, p. 240
^ Blenkinsop 1925, pp. 235–6
^ Massey 1920, p. 340
^ Wavell 1968, p. 218
^ Wavell 1968, p. 218-9
^ Preston 1921, pp. 331, 333–4
^ Wavell 1968 pp. 216
^ Preston 1921, p.332
^ Jones 1987, pp. 146–7
^ Preston 1921, p. 335
^ Massey 1920, p. 338
^ Preston 1921, p. 333
^ Powles 1922, p. 236
^ Wavell 1968, p. 219
^ Massey 1920, p. 339
^ Preston 1921, p. 331
^ Powles 1922, p. 236
Bibliography
.mw-parser-output .refbegin{font-size:90%;margin-bottom:0.5em}.mw-parser-output .refbegin-hanging-indents>ul{list-style-type:none;margin-left:0}.mw-parser-output .refbegin-hanging-indents>ul>li,.mw-parser-output .refbegin-hanging-indents>dl>dd{margin-left:0;padding-left:3.2em;text-indent:-3.2em;list-style:none}.mw-parser-output .refbegin-100{font-size:100%}
"General Staff General Headquarters Egyptian Expeditionary Force". Canberra: Australian War Memorial. February 1918.
"General Staff Headquarters Anzac Mounted Division War Diary". Canberra: Australian War Memorial. December 1916. Archived from the original on 2011-03-21.
"1st Light Horse Brigade War Diary". Canberra: Australian War Memorial. March 1917. Archived from the original on 2011-03-21.
Bowman–Manifold, M. G. E. (1923). An Outline of the Egyptian and Palestine Campaigns, 1914 to 1918 (2nd ed.). Chatham: W. & J. Mackay for The Institution of Royal Engineers. OCLC 224893679.
Bruce, Anthony (2002). The Last Crusade: The Palestine Campaign in the First World War. London: John Murray. ISBN 978-0-7195-5432-2.
Carver, Michael, Field Marshal Lord (2003). The National Army Museum Book of The Turkish Front 1914–1918 The Campaigns at Gallipoli, in Mesopotamia and in Palestine. London: Pan Macmillan. ISBN 978-0-283-07347-2.
Coulthard-Clark, Chris (1998). Where Australians Fought: The Encyclopaedia of Australia's Battles. St Leonards: Allen and Unwin. ISBN 1-86448-611-2.
Cutlack, Frederic Morley (1941). The Australian Flying Corps in the Western and Eastern Theatres of War, 1914–1918. Official History of Australia in the War of 1914–1918. VIII (11th ed.). Canberra, ACT: Australian War Memorial. OCLC 220900299.
Falls, Cyril; Becke, A. F. (maps) (1930). Military Operations Egypt & Palestine from June 1917 to the End of the War. Official History of the Great War Based on Official Documents by Direction of the Historical Section of the Committee of Imperial Defence. II. Part I. London: HMSO. OCLC 644354483.
Falls, Cyril; Becke, A. F. (maps) (1930). Military Operations Egypt & Palestine from June 1917 to the End of the War. Official History of the Great War Based on Official Documents by Direction of the Historical Section of the Committee of Imperial Defence. II. Part II. London: HMSO. OCLC 256950972.
Gullett, Henry S. (1941). The Australian Imperial Force in Sinai and Palestine, 1914–1918. Official History of Australia in the War of 1914–1918. VII (11th ed.). Canberra: Australian War Memorial. OCLC 220900153.
Jones, Ian (1987). Australians at War: The Australian Light Horse. North Sydney: Time-Life Books (Australia). OCLC 255503233.
Keogh, E. G.; Graham, J. (1955). Suez to Aleppo. Melbourne: Directorate of Military Training by Wilkie. OCLC 220029983.
McGuirk, Russell (2007). The Sanusi's Little War: The Amazing Story of a Forgotten Conflict in the Western Desert, 1915–1917. London: Arabian Publishing. OCLC 156803398.
Massey, William T. (1920). Allenby's Final Triumph. London: Constable. OCLC 345306.
Powles, C. Guy; Wilkie, A. (1922). The New Zealanders in Sinai and Palestine. Official History New Zealand's Effort in the Great War. III. Auckland: Whitcombe & Tombs. OCLC 2959465.
Preston, R. M. P. (1921). The Desert Mounted Corps: An Account of the Cavalry Operations in Palestine and Syria 1917–1918. London: Constable. OCLC 3900439.
Wavell, Field Marshal Earl (1968) [1933]. "The Palestine Campaigns". In Sheppard, Eric William. A Short History of the British Army (4th ed.). London: Constable. OCLC 35621223.
Woodward, David R. (2006). Hell in the Holy Land: World War I in the Middle East. Lexington: The University Press of Kentucky. ISBN 978-0-8131-2383-7.


